Vlan چیست و چگونه پیاده سازی می شود
.
شبکه محلی مجازی (VLAN) یک روش لایه 2 است که اجازه می دهد تا چندین شبکه مجازی بر روی یک رابط فیزیکی تک (اترنت، بی سیم و …)، که توانایی شبکه های جداگانه را به طور موثر ایفا می کند، ایجاد شود.
شما می توانید MikroTik RouterOS (و همچنین سیسکو IOS، لینوکس و دیگر سیستم های روتر) را برای علامت گذاری این بسته ها و نیز پذیرش و روت از آنها استفاده کنید.
همانطور که VLAN در OSI Layer 2 کار می کند، می توان آن را مانند هر رابط شبکه دیگر بدون محدودیت استفاده کرد. VLAN با موفقیت از طریق پلهای اترنت عبور می کند.
شما همچنین می توانید VLAN ها را از طریق لینک های بی سیم انتقال دهید و چندین واسط VLAN را در یک رابط بیسیم قرار دهید.
توجه داشته باشید که همانطور که VLAN یک پروتکل کامل تونلی نیست (به عنوان مثال، فیلدهای اضافی برای انتقال آدرسهای MAC فرستنده و گیرنده را ندارد)،
همین محدودیت برای اتصال به شبکه VLAN به عنوان رابطهای بی سیم ساده استفاده می شود.
به عبارت دیگر، در حالی که مشتریان بی سیم می توانند در VLAN ها در واسط های بی سیم قرار بگیرند، امکان اتصال VLAN به یک رابط بی سیم در حالت station mode bridged با هر رابط دیگر وجود ندارد.
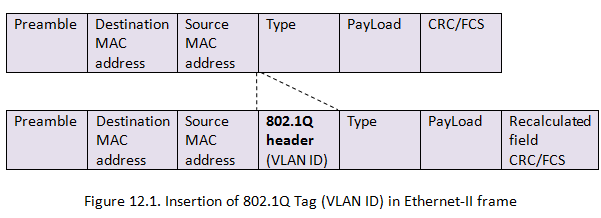
802.1Q
پروتکل معمولی برای شبکه های مجازی VLANs IEEE 802.1Q است. این یک پروتکل کپسوله سازی استاندارد است که نحوه قرار دادن شناسه چهار بایت VLAN را در هدر اترنت تعریف می کند.
مثال:
هر VLAN به عنوان یک زیر شبکه جداگانه مورد استفاده قرار می گیرد.
به این معنی که به طور پیش فرض، یک میزبان در یک VLAN خاص نمی تواند با یک میزبان که یکی از اعضای یکی دیگر از VLAN هاست ارتباط برقرار کند،
هرچند که آنها در یک سوئیچ متصل هستند. بنابراین اگر شما می خواهید ارتباط بین VLAN هارا داشته باشید،
نیاز به روتر دارید. 4095 رابط VLAN را RouterOS پشتیبانی می کند،
هر کدام با یک شناسه VLAN منحصر به فرد، در هر رابط اولویت های VLAN نیز می تواند مورد استفاده و دستکاری قرار گیرد.
هنگامی که VLAN بیش از یک سوئیچ را گسترش می دهد، پیوند بین سوئیچ باید تبدیل به یک “ترانک” شود،
در صورتی که بسته ها نشان می دهند که کدام VLAN به آنها تعلق دارد.
یک ترانک ترافیک چندین VLAN را منتقل می کند؛ این همانند یک پیوند نقطه به نقطه است که بسته های برچسب شده بین سوئیچ ها یا بین سوئیچ و روتر را منتقل می کند.

نکته: استاندارد IEEE 802.1Q شناسه های VLAN خاصی را رزرو کرده است، شناسه های VLAN زیر نباید در تنظیمات عمومی VLAN استفاده شوند:
0، 1، 4095
Q-in-Q
802.1Q اجازه می دهد تا تنها یک هدر vlan، Q-in-Q از سوی دیگر به دو یا چند header vlan متصل شود . در RouterOS Q-in-Q می توان با اضافه کردن یک رابط VLAN به اینترفیس یک Vlan دیکر را پیکر بندی کرد
مثال:
/interface vlan
add name=vlan1 vlan-id=11 interface=ether1
add name=vlan2 vlan-id=12 interface=vlan1
اگر هر بسته بر روی رابط “vlan2” ارسال شود، دو برچسب vlan ’11’ و ’12’.
به هدر اترنت اضافه خواهد شد –
مثال های اجرایی!
مثال لایه 2

Port Based VLAN #1
رابط کاربری VLAN مورد نیاز را در رابط اترنت برای ساخت آن به عنوان یک پورت VLAN ترانک اضافه کنید
/interface vlan
add interface=ether2 name=eth2-vlan200 vlan-id=200
add interface=ether2 name=eth2-vlan300 vlan-id=300
add interface=ether2 name=eth2-vlan400 vlan-id=400
- برای هر vlan یک بریج بسازید
/interface bridge
add name=bridge-vlan200
add name=bridge-vlan300
add name=bridge-vlan400
- Add VLAN interfaces to their corresponding bridges and ethernet interfaces where untagged traffic is necessary
/interface bridge port
add bridge=bridge-vlan200 interface=eth2-vlan200
add bridge=bridge-vlan200 interface=ether6
add bridge=bridge-vlan300 interface=eth2-vlan300
add bridge=bridge-vlan300 interface=ether7
add bridge=bridge-vlan400 interface=eth2-vlan400
add bridge=bridge-vlan400 interface=ether8
Port based VLAN tagging #2 (Trunk and Hybrid ports)

Port Based VLAN #2
- Add necessary VLAN interfaces on ethernet interfaces to make them as VLAN trunk ports
/interface vlan
add interface=ether2 name=eth2-vlan200 vlan-id=200
add interface=ether2 name=eth2-vlan300 vlan-id=300
add interface=ether2 name=eth2-vlan400 vlan-id=400
add interface=ether6 name=eth6-vlan300 vlan-id=300
add interface=ether6 name=eth6-vlan400 vlan-id=400
add interface=ether7 name=eth7-vlan200 vlan-id=200
add interface=ether7 name=eth7-vlan400 vlan-id=400
add interface=ether8 name=eth8-vlan200 vlan-id=200
add interface=ether8 name=eth8-vlan300 vlan-id=300
- Add bridges for each VLAN
/interface bridge
add name=bridge-vlan200
add name=bridge-vlan300
add name=bridge-vlan400
- Add VLAN interfaces to their corresponding bridges and ethernet interfaces where untagged traffic is necessary
/interface bridge port
add bridge=bridge-vlan200 interface=eth2-vlan200
add bridge=bridge-vlan200 interface=eth7-vlan200
add bridge=bridge-vlan200 interface=eth8-vlan200
add bridge=bridge-vlan200 interface=ether6
add bridge=bridge-vlan300 interface=eth2-vlan300
add bridge=bridge-vlan300 interface=eth6-vlan300
add bridge=bridge-vlan300 interface=eth8-vlan300
add bridge=bridge-vlan300 interface=ether7
add bridge=bridge-vlan400 interface=eth2-vlan400
add bridge=bridge-vlan400 interface=eth6-vlan400
add bridge=bridge-vlan400 interface=eth7-vlan400
add bridge=bridge-vlan400 interface=ether8
Layer3 VLAN examples
Simple VLAN routing
Lets assume that we have several MikroTik routers connected to a hub. Remember that a hub is an OSI physical layer device (if there is a hub between routers, then from L3 point of view it is the same as an Ethernet cable connection between them). For simplification assume that all routers are connected to the hub using ether1 interface and has assigned IP addresses as illustrated in figure below. Then on each of them the VLAN interface is
فرض می کنیم که ما چند روتر MikroTik متصل به هاب داریم.
 به یاد داشته باشید که هاب یک دستگاه OSI لایه فیزیکی است (اگر یک هاب بین روترها وجود داشته باشد، پس از نقطه نظر L3 همانند اتصال کابل اترنت بین آنها است).
برای ساده سازی، فرض کنید که همه روترها با استفاده از رابط اتر 1 به هاب متصل شده ، آدرس IP را همانطور که در تصویر زیر نشان داده شده است اختصاص دادهایم. سپس در هر یک از آنها رابط VLAN ایجاد کرده ایم

Configuration for R2 and R4 is shown below:
R2:
[admin@MikroTik] /interface vlan> print
Flags: X – disabled, R – running, S – slave
# NAME MTU ARP VLAN-ID INTERFACE
0 R VLAN2 1500 enabled 2 ether1
R4:
[admin@MikroTik] /interface vlan> print
Flags: X – disabled, R – running, S – slave
# NAME MTU ARP VLAN-ID INTERFACE
0 R VLAN2 1500 enabled 2 ether1
The next step is to assign IP addresses to the VLAN interfaces.
گام بعدی این است که IP آدرس را به اینترفیس VLAN اختصاص دهید.
R2:
[admin@MikroTik] ip address> add address=10.10.10.3/24 interface=VLAN2
[admin@MikroTik] ip address> printFlags: X – disabled, I – invalid, D – dynamic
# ADDRESS NETWORK BROADCAST INTERFACE
0 10.0.1.4/24 10.0.1.0 10.0.1.255 ether1
1 10.20.0.1/24 10.20.0.0 10.20.0.255 pc1
2 10.10.10.3/24 10.10.10.0 10.10.10.255 vlan2
[admin@MikroTik] ip address>
R4:
[admin@MikroTik] ip address> add address=10.10.10.5/24 interface=VLAN2
[admin@MikroTik] ip address> printFlags: X – disabled, I – invalid, D – dynamic
# ADDRESS NETWORK BROADCAST INTERFACE
0 10.0.1.5/24 10.0.1.0 10.0.1.255 ether1
1 10.30.0.1/24 10.30.0.0 10.30.0.255 pc2
2 10.10.10.5/24 10.10.10.0 10.10.10.255 vlan2
[admin@MikroTik] ip address>
At this point it should be possible to ping router R4 from router R2 and vice versa:
در این مرحله باید روتر R4 را از روتر R2 پینگ بگیریم و برعکس:
“Ping from R2 to R4:”
[admin@MikroTik] ip address> /ping 10.10.10.5
10.10.10.5 64 byte ping: ttl=255 time=4 ms
10.10.10.5 64 byte ping: ttl=255 time=1 ms
2 packets transmitted, 2 packets received, 0% packet loss
round-trip min/avg/max = 1/2.5/4 ms
“From R4 to R2:”
[admin@MikroTik] ip address> /ping 10.10.10.3
10.10.10.3 64 byte ping: ttl=255 time=6 ms
10.10.10.3 64 byte ping: ttl=255 time=1 ms
2 packets transmitted, 2 packets received, 0% packet loss
round-trip min/avg/max = 1/3.5/6 ms
To make sure if VLAN setup is working properly, try to ping R1 from R2. If pings are timing out then VLANs are successfully isolated.
برای اطمینان از اینکه آیا تنظیم VLAN به درستی کار می کند، سعی کنید P2 را از R2 پینگ کنید. اگر پینگ ها تیم اوت شوند، VLAN ها با موفقیت جدا شده اند.
“From R2 to R1:”
[admin@MikroTik] ip address> /ping 10.10.10.2
10.10.10.2 ping timeout
10.10.10.2 ping timeout
3 packets transmitted, 0 packets received, 100% packet loss
InterVLAN routing
If separate VLANs are implemented on a switch, then a router is required to provide communication between VLANs. Switch works at OSI layer 2 so it uses only Ethernet header to forward and does not check IP header. For this reason we must use the router that is working as a gateway for each VLAN. Without a router, a host is unable to communicate outside of its own VLAN. Routing process between VLANs described above is called inter-VLAN communication.
اگر VLAN های جداگانه بر روی یک سوئیچ اجرا شوند، یک روتر برای برقراری ارتباط بین VLAN ها لازم است. سوئیچ در لایه 2 OSI کار می کند.
بنابراین فقط هدر اترنت را به جلو هدایت می کند و هدر IP را بررسی نمی کند.
به همین دلیل ما باید از روتر استفاده کنیم که به عنوان یک دروازه برای هر VLAN کار کند.
بدون یک روتر، میزبان قادر به برقراری ارتباط خارج از VLAN خود نیست.
فرایند مسیریابی بین VLAN ها که در بالا شرح داده شد، ارتباط بین VLAN نامیده می شود.
برای نشان دادن ارتباط بین VLAN، ما یک ترانک را ایجاد خواهیم کرد که ترافیک را از سه Vlan در یک لینک واحد بین روتر Mikrotik و یک سوئیچ قابل کنترل که از trunking VLAN پشتیبانی می کند، منتقل می کند
To illustrate inter-VLAN communication, we will create a trunk that will carry traffic from three VLANs (VLAN2 and VLAN3, VLAN4) across a single link between a Mikrotik router and a manageable switch that supports VLAN trunking.

Each VLAN has its own separate subnet (broadcast domain) as we see in figure above:
هر VLAN دارای زیر شبکه جداگانه ای است (broadcast domain) همانطور که در شکل بالا دیده می شود:
- VLAN 2 – 10.10.20.0/24;
- VLAN 3 – 10.10.30.0/24;
- VLAN 4 – 10.10.40.0./24.
VLAN configuration on most switches is straightforward, basically we need to define which ports are members of the VLANs and define a ‘trunk’ port that can carry tagged frames between the switch and the router.
پیکربندی VLAN بر روی اکثر سوئیچ ها ساده است، اساسا ما باید مشخص کنیم که کدام پورت ها اعضای VLAN هستند و پورت “trunk” را تعریف می کنیم که می تواند فریم های tagged بین سوئیچ و روتر را منتقل کنند.
“Configuration example on MikroTik router:”
“مثال پیکربندی در روتر MikroTik:”
“Create VLAN interfaces:”
“ایجاد رابط VLAN:”
/interface vlan
add name=VLAN2 vlan-id=2 interface=ether1 disabled=no
add name=VLAN3 vlan-id=3 interface=ether1 disabled=no
add name=VLAN4 vlan-id=4 interface=ether1 disabled=no
“Add IP addresses to VLANs:”
/ip address
add address=10.10.20.1/24 interface=VLAN2
add address=10.10.30.1/24 interface=VLAN3
add address=10.10.40.1/24 interface=VLAN4
RouterOS /32 and IP unnumbered addresses
In RouterOS, to create a point-to-point tunnel with addresses you have to use address with a network mask of ‘/32’ that effectively brings you the same features as some vendors unnumbered IP address.
There are 2 routers RouterA and RouterB where each is part of networks 10.22.0.0/24 and 10.23.0.0/24 respectively and to connect these routers using VLANs as a carrier with the following configuration:
در RouterOS، برای ایجاد یک تونل نقطه به نقطه با آدرس های شما باید از آدرس با یک network mask ای از ‘/ 32’ استفاده کنید
2 مسیریاب RouterA و RouterB وجود دارد که هر کدام بخشی از شبکه های 10.22.0.0/24 و 10.23.0.0/24 هستند و برای اتصال این روترها با استفاده از VLAN ها به عنوان یک حامل
با تنظیمات زیر :

RouterA:
/ip address add address=10.22.0.1/24 interface=ether1
/interface vlan add interface=ether2 vlan-id=1 name=vlan1
/ip address add address=10.22.0.1/32 interface=vlan1 network=10.23.0.1
/ip route add gateway=10.23.0.1 dst-address=10.23.0.0/24
RouterB:
/ip address add address=10.23.0.1/24 interface=ether1
/interface vlan add interface=ether2 vlan-id=1 name=vlan1
/ip address add address=10.23.0.1/32 interface=vlan1 network=10.22.0.1
/ip route add gateway=10.22.0.1 dst-address=10.22.0.0/24